멀티 플레이어 게임메시지 설계를 통해 AKKA-액터모델의 특징을 알아보겠습니다.
이 아티컬의 목표 : 여기서 진행되는 설계방식이 항상 권장되는 아키텍처는 아니며
웹소켓과 액터를 연결하여 심플한 멀티플레이어 웹게임서비스를 작성을 할수있는
메시지 중심의 최소한의 설계와 작동하는 최소한의 기능구현을 시도해보았습니다.
웹소켓및 스프링 웹등은 메시지 기반의 멀티플레이어 게임을 만들기 위한 도구일뿐이며
메시지 설계는 직접해야합니다. 여기서는 액터패턴을 일부사용하였으며
설명을 위해 UML TOOL(STAR UML)을 이용하였습니다.
AKKA의 액터를 이용한 버젼과, 전통적인 스레드를 사용하는 동일한 기능을 하는 두가지 버전을 준비하였습니다.
스레드 버젼은 프로타잎용으로 먼저작성을 하였고, 이후 액터버젼으로 추가구현을 하였습니다.
두가지는 같은 서버로직을 가지고 있으나 다른 메시지 패턴을 사용하였습니다.
스레드모델 VS 액터 모델
- 스레드 모델 : https://github.com/psmon/gameweb/tree/master/src/main/java/com/vgw/demo/gameweb/thread
- 액터모델 : https://github.com/psmon/gameweb/tree/master/src/main/java/com/vgw/demo/gameweb/actor
- 전체 Code : https://github.com/psmon/gameweb
UseCase 설계
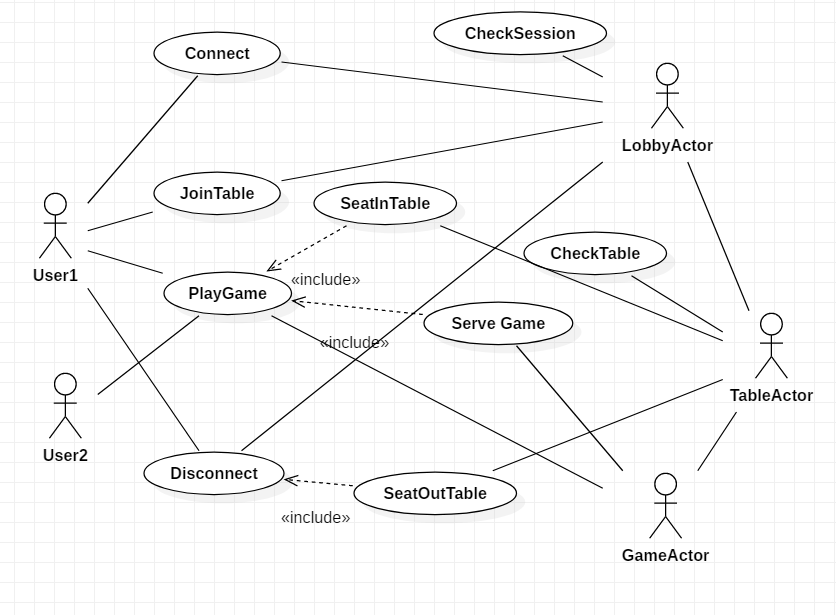
여기서 Actor는 처리가능한 서버로직입니다. 게임에 입장하기 전까지 UseCase를 통해 정리해보는것입니다.
메시지 흐름 중심이며 , AKKA의 액터모델로 구현하는것입니다.
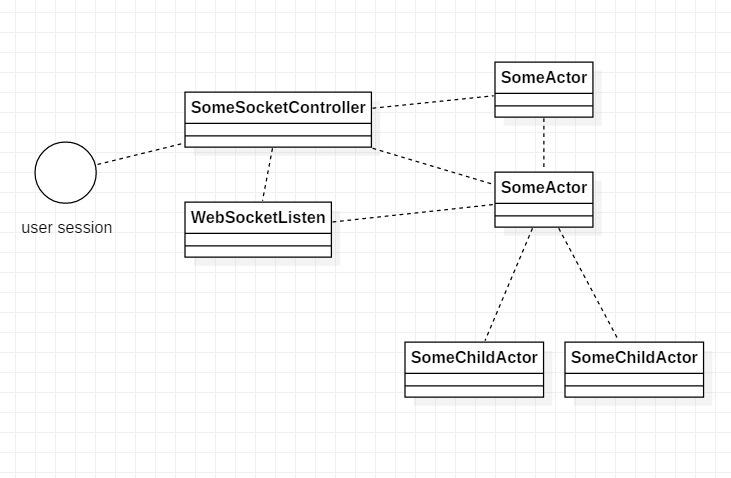
액터 구성
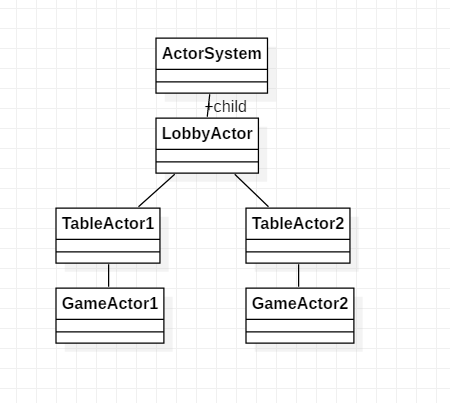
UserCase 구상이 완료되면, 실제 메시지를 처리할 인스턴스를 작성하고 구조적으로 배치해야합니다.
AKKA System을 선택한 이유는, 액터를 잘 설계한다고하면, 코드의 큰 수정없이 클러스터로 확장이 용이합니다. - https://doc.akka.io/docs/akka/2.5/cluster-usage.html#a-simple-cluster-example
당장은 분산처리를 신경쓰지 않고 진행을 하여도, 이후 설계의 큰 변경없이 클러스터화가능합니다. - AKKA 액터의 장점
아직은 아무기능이 없으며 서버 기능을 하는 액터를 옹기종기 잘 모아 놓습니다.
응집력 있는 설계라도 표현되기도 합니다. ( 응집력 = 옹기종기 )
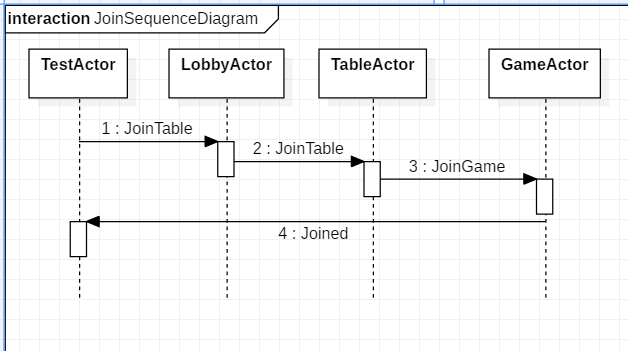
메시지 흐름 설계
그 다음 해야할일은 메시지 흐름을 구체화하는것입니다.
액터에 실제 메시지흐름을 정의하고 이 베이스로 액터의 메시지 흐름을 처리하는 코드를 작성할것입니다.
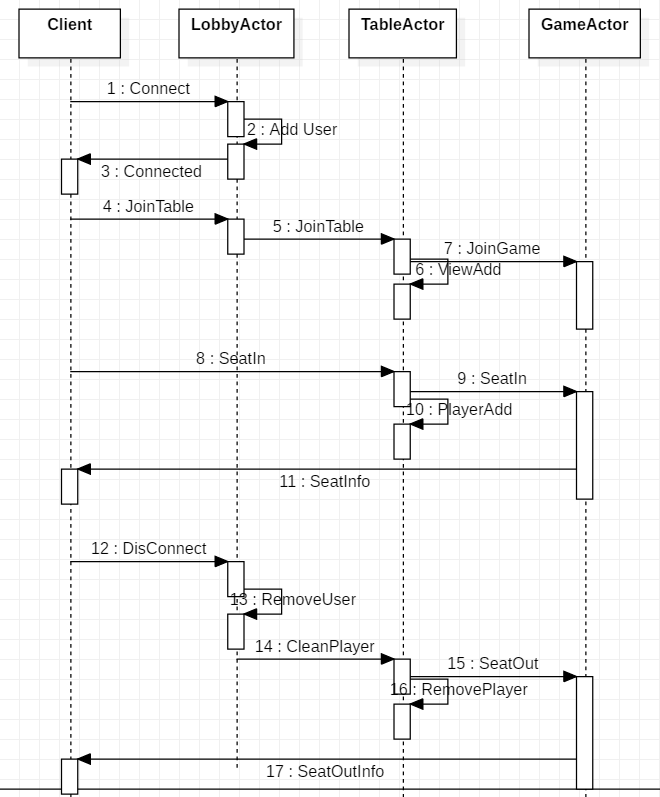
게임에 접속하고, 멀티플레이를 위한 테이블 공간에 참여시키는 메시지 시퀀스 다이어 그램
AKKA의 액터는 최종 프론트단(사용자) 에게 제공하는 통신 프로토콜이 아니며
웹소켓(WS)와 유연하게 연결하는 커뮤니케이션 레이어작성이 필요합니다.
메시지 처리기 구현
액터의 메시지는 오브젝트의 패턴매칭을 통해 분기처리가 가능합니다.
조금더 진보된 방식의 switch 구문이라고 보면 되겠습니다.
최근 모던 언어들은 대부분 패턴매칭을 언어 자체에서 지원하는 경우가 많습니다.
@Override
public AbstractActor.Receive createReceive() {
    return receiveBuilder()
            .match(ConnectInfo.class, c -> {
                if(c.getCmd()== ConnectInfo.Cmd.CONNECT){
                    sessionMgr.put(c.getSessionId(),c.getWsSender());
                    log.info("user connected:"+c.getSessionId());
                }else if(c.getCmd()== ConnectInfo.Cmd.DISCONET){
                    sessionMgr.remove(c.getSessionId());
                    Player removeUser = new Player();
                    removeUser.setSession(c.getSessionId());

                    if(c.getTableNo()>0){
                        findTableByID(c.getTableNo()).tell(new SeatOut(removeUser),ActorRef.noSender());
                    }else{
                        findTableALL().tell(new SeatOut(removeUser),ActorRef.noSender());
                    }
                    log.info("user disconnected:"+c.getSessionId());
                }
                sessionMgr.put(c.getSessionId(),c.getWsSender());
            })
            .match(TableCreate.class, t->{
                // Create a table under the lobby, if you have an Actor named TableManagement, you can move easily.
                String tableUID = "table-" + t.getTableId();
                if(t.getCmd() == TableCreate.Cmd.CREATE){
                    ActorRef tableActor = getContext().actorOf( TableActor.props(t,this.getSelf() ), tableUID);
                    tableActor.tell(t,ActorRef.noSender());
                }
            })
            .match(JoinGame.class, j->{
                joinGameTable(j.getTableId(),j.getName(),j.getSession());
            })
            .match(MessageWS.class, m->{
                send(m.getSession(),m.getGameMessage());
            })
            .build();
}
ActorPath를 통한 메시지 전송
액터의 중요한 속성중 하나이며, 액터는 그 어떤 액터와 상태 공유를 하지 않습니다. ( 할수없습니다.)
로컬에서 개발되었다고 해도 그 어떤 참조값을 도트로 얻어 낼수 없습니다.(메모리 공유를 원천 차단합니다.)
오로지 메시지를 통해서만 명령,응답을 기대할수 있습니다.
OOP VS ACTOR
| OOP | ACTOR |
|---|---|
Lobby a; a.getTable(1).getTableName(); | LobbyActor a; TableActor b; b.tell("some ask",a) |
OOP 객체중심의 설계는 네트워크로 확장이 어려울수 있습니다. - 원격지 오브젝트의 참조를 얻어낼수 있을까요? 답은 아니오입니다.
위 두차이를 이해하고, OOP를 적절하게 활용하여 액터에 내장을 시키면 OOP를 분산처리가능한 네트워크로 기능으로
확장할수 있습니다. ( 멀티스레드 프로그래밍과 네트워크 프로그래밍을 단순화하는 전략입니다.)
주소를 통한 Ask패턴사용
private ActorRef findTableByID(int tableID) throws Exception {
    String tableActorPath = "/user/lobby/table-"+tableID;
    ActorSelection tableSelect = this.getContext().actorSelection(tableActorPath);
    FiniteDuration duration = FiniteDuration.create(1, TimeUnit.SECONDS);
    Future<ActorRef> fut = tableSelect.resolveOne(duration);
    ActorRef tableActor = Await.result(fut, duration);
    return tableActor;
}
상대의 액터주소만 알고 있다면 , 원격지라 할지라도 상대의 액터 객체를 알지못해도 통신이 가능합니다.
객체를 통한 전송
ActorRef someActor = system.ActorOf(........);
someActor.tell("some message",null);
주로 로컬에서 활용되며, 액터는 생성시점 액터참조를 바로 얻을수 있습니다. 하지만 상대 액터가 가진
멤버접근을 통한 정보 획득은 불가하며 로컬이라 할지라도 tell 로 질의를 해야합니다.
로컬에서의 개발시 메모리접근을 못한다는것은 아주 큰 제약이 될수 있으나, 리모트로 확장한다고 가정해봅시다.
리모트 컴퓨터의 메모리를 접근하려면 기존 개발코드를 다시 작성해야할것입니다. 이것은 리모트뿐만 아니라
단일노드 동시처리에서도 스레드모델에서 발생하는 Lock/Unlock의 복잡한 문제를 직접 코드로 구현할 필요가 없어진다란 점입니다.
주소선택을 통한 전송
ActorSelection lobbyActor = system.ActorSelection("user/lobby");
lobbyActor.tell("some message",null);


// 자식의 모든 요소 선택이 가능합니다.
ActorSelection tableAllActor = system.ActorSelection("user/lobby/table/*");
tableAllActor.tell("some message",null);
웹소켓을 액터에 연결하기
게임 메시지처리를위해 웹소켓을 이용할것이며,
스프링에 웹소켓을 탑재를 시도 해봅시다.
컨셉
웹소켓을 액터와 연동하여 복잡해지는 메시지 전송을 단순화할것입니다.
여기서는 웹소켓모듈을 스프링에 탑재하여, 간단한 메시지 전송을 해보는것입니다.
디펜던시
<dependency>
   <groupId>org.springframework.boot</groupId>
   <artifactId>spring-boot-starter-websocket</artifactId>
</dependency>


<dependency>
   <groupId>org.webjars</groupId>
   <artifactId>webjars-locator-core</artifactId>
</dependency>
<dependency>
   <groupId>org.webjars</groupId>
   <artifactId>sockjs-client</artifactId>
   <version>1.0.2</version>
</dependency>

<dependency>
   <groupId>org.webjars</groupId>
   <artifactId>stomp-websocket</artifactId>
   <version>2.3.3</version>
</dependency>
Stomp 웹소켓을 Spring에 탑재하여 사용할것입니다.
참고링크 : https://spring.io/guides/gs/messaging-stomp-websocket/
세션관리및 소켓 핸들러
public class WebSocketEventListener {
    @Autowired
    Lobby lobby;

    @Autowired
    private ActorSystem system;

    private static final Logger logger = LoggerFactory.getLogger(WebSocketEventListener.class);

    @Autowired
    private SimpMessageSendingOperations messagingTemplate;

    @EventListener
    public void handleWebSocketConnectListener(SessionConnectedEvent event) {
        logger.info("Received a new web socket connection");
        StompHeaderAccessor headerAccessor = StompHeaderAccessor.wrap(event.getMessage());
        String sessionId = headerAccessor.getUser().getName();
    }

    @EventListener
    void handleSessionConnectedEvent(SessionConnectedEvent event) {
        // Get Accessor
        StompHeaderAccessor sha = StompHeaderAccessor.wrap(event.getMessage());
        String sessionId = sha.getUser().getName();

        // OOP VS MESSAGE

        // #OOP - It's simple to develop locally, but many things need to change in order to be extended remotely.
        lobby.addSender(sessionId,messagingTemplate);

        // #ACTOR - This can be extended to remote without implementation changes.
        ActorSelection lobby = system.actorSelection("/user/lobby");
        lobby.tell(new ConnectInfo(sessionId,messagingTemplate, ConnectInfo.Cmd.CONNECT), ActorRef.noSender());

        // Suppose you create several child actors under table.
        // You can send a message to all children with the following commands.
        // This is very useful.
        // Sameple Cmd : ActorSelection lobby = system.actorSelection("/user/table/*");
    }

    @EventListener
    public void handleWebSocketDisconnectListener(SessionDisconnectEvent event) {
        StompHeaderAccessor headerAccessor = StompHeaderAccessor.wrap(event.getMessage());
        String username = (String) headerAccessor.getSessionAttributes().get("username");
        String session = headerAccessor.getUser().getName();

        if(username != null) {
            logger.info("User Disconnected : " + username);
            GameMessage gameMessage = new GameMessage();
            gameMessage.setType(GameMessage.MessageType.LEAVE);
            gameMessage.setSender(username);
            //messagingTemplate.convertAndSend("/topic/public", gameMessage);

            // #OOP
            lobby.removeSender(session);

            // #ACTOR
            ActorSelection lobby = system.actorSelection("/user/lobby");
            lobby.tell(new ConnectInfo(session,messagingTemplate, ConnectInfo.Cmd.DISCONET), ActorRef.noSender());
        }
    }

}
웹소켓에서 유니크한 사용자세션을 감지하고 접속과 접속끊김을 관리하는것은 제일 처음해야하는 일입니다.
게임 로직에서도 이러한 이벤트를 전달하여, 사용자의 접속 처리를 하는것은 중요한 작업입니다.
실제코드 참고:
- https://github.com/psmon/gameweb/blob/master/src/main/java/com/vgw/demo/gameweb/config/WebSocketConfig.java
- https://github.com/psmon/gameweb/blob/master/src/main/java/com/vgw/demo/gameweb/controler/ws/WebSocketEventListener.java
서버 컨트롤러 준비
@Controller
@SuppressWarnings("Duplicates")
public class GameController {

    private static final Logger logger = LoggerFactory.getLogger(GameController.class);

    @MessageMapping("/game.req")
    @SendTo("/topic/public")
    public GameMessage gameReq(@Payload GameMessage gameMessage,
                               SimpMessageHeaderAccessor headerAccessor) {

        String  sessionId = headerAccessor.getUser().getName();
        logger.info("GameMsg:" + gameMessage );
        String gamePacket = gameMessage.getContent();
        String splitMessage[] = gamePacket.split("!!");

        String userName = headerAccessor.getSessionAttributes().get("username").toString();
        String userSession =  headerAccessor.getUser().getName();

        Object objTableNo = headerAccessor.getSessionAttributes().get("tableNo");
        Integer tableNo = objTableNo!=null? (Integer)objTableNo : -1;
....
}
서버와 클라이언트가 주고받을 메시지를 정의하는것입니다.
디테일하게 여러메시지를 정의할수도 있지만, 여기서는 단일 메시지로 대부분의 게임처리를 가능하게 심플하게 설계하였습니다.
다음해야할일은, 클라이언트의 전송을 받을수 있는 서버 컨트롤러를 준비하는것입니다.
참고소스:
- https://github.com/psmon/gameweb/tree/master/src/main/java/com/vgw/demo/gameweb/message
- https://github.com/psmon/gameweb/blob/master/src/main/java/com/vgw/demo/gameweb/controler/ws/GameController.java
프론트 JS코드 준비
var stompClient = null;

function setConnected(connected) {
    $("#connect").prop("disabled", connected);
    $("#disconnect").prop("disabled", !connected);
    if (connected) {
        $("#conversation").show();
    }
    else {
        $("#conversation").hide();
        sceneControler('intro');
    }
    $("#greetings").html("");
}

function connect() {
    var socket = new SockJS('/ws');
    stompClient = Stomp.over(socket);
    stompClient.connect({}, function (frame) {
        setConnected(true);
        console.log('Connected: ' + frame);

        // for broad cast
        stompClient.subscribe('/topic/public', onMessageReceived );

        // for send to some
        stompClient.subscribe('/user/topic/public', onMessageReceived );

        var username=$("#name").val();
        if(username.length<1){username="Unknown"};
        // Tell your username to the server
        stompClient.send("/app/lobby.addUser",
            {},
            JSON.stringify({sender: username, type: 'JOIN'})
        )
    });
}

function disconnect() {
    if (stompClient !== null) {
        stompClient.disconnect();
    }
    setConnected(false);
    console.log("Disconnected");
}

function joinTable(tableNo) {
    stompClient.send("/app/game.req",
        {},
        JSON.stringify({content: 'join',num1:tableNo, type: 'GAME'})
    )
}

function seatTable() {
    stompClient.send("/app/game.req",
        {},
        JSON.stringify({content: 'seat', type: 'GAME'})
    )
}


function sendChatMsg() {
    var content = $('#gamemsg').val();
    stompClient.send("/app/hello",
        {},
        JSON.stringify({content: content, type: 'CHAT'})
    )
}

function sendGameMsg() {
    var content = $('#gamemsg').val();
    stompClient.send("/app/game.req",
        {},
        JSON.stringify({content: content, type: 'GAME'})
    )
}

function sendGameAction(action) {
    var content = $('#gamemsg').val();
    stompClient.send("/app/game.req",
        {},
        JSON.stringify({content: action.content,num1:action.num1,num2:action.num2, type: 'ACTION'})
    )
}

function showGreeting(message) {
    $("#greetings").append("<tr><td>" + message + "</td></tr>");
}

function onMessageReceived(payload) {
    var message = JSON.parse(payload.body);

    var messageElement = document.createElement('li');

    if(message.type == 'JOIN') {
        showGreeting('Welcome ' + message.sender)
    } else if (message.type == 'LEAVE') {
        showGreeting(message.sender + 'left!')
    } else if(message.type == 'GAME'){
        messageControler(message);
        //showGreeting(message.content);
    } else{
        showGreeting(message.content);
    }
}

$(function () {
    $("form").on('submit', function (e) {
        e.preventDefault();
    });
    $( "#connect" ).click(function() { connect(); });
    $( "#disconnect" ).click(function() { disconnect(); });
    $( "#send" ).click(function() { sendGameMsg(); });


});
그리고 서버 접속이 가능한 프론트 웹소켓 .js 코드를 준비하는것입니다.
다음 4가지 주요요소를 구현하여 실시간 메시지처리를 게임에 이용합니다.
connect : 컨넥션을 시도하고 성공을 감지
- disconnect : 서버에의한 접속해지 감지
- onMessage : 서버에의한 메시지 이벤트
- send : 서버에게 전송할 메시지
참고소스:
유닛테스트
액터는 일반적으로 비동기적으로 작동이되며, 메시지 설계도 기다림이 없어야합니다.
이러한 메시지 확인을 위해 결과값을 기다리게 하는것이 일반적이지만, 우리의 서비스는 비동기적으로 계속 작동되어야합니다.
Akka의 TestKit은 유닛 테스트시 메시지를 검사하는 툴을 제공하며, 우리가 설계한 액터를 멈추지 않고 순차적인 검사를 지원합니다.
TestCase
TestCode
import akka.actor.ActorRef;
import akka.actor.ActorSystem;
import akka.testkit.javadsl.TestKit;
import org.junit.AfterClass;
import org.junit.BeforeClass;
import org.junit.Test;
import org.junit.runner.RunWith;
import org.springframework.boot.test.context.SpringBootTest;
import org.springframework.test.context.ContextConfiguration;
import org.springframework.test.context.junit4.SpringRunner;
import java.time.Duration;

@RunWith(SpringRunner.class)
@SpringBootTest
@ContextConfiguration(classes = AppConfiguration.class)
@SuppressWarnings("Duplicates")
public class SessionTest {

    static ActorSystem system;

    @BeforeClass
    public static void setup() {
        system = ActorSystem.create();
    }

    @AfterClass
    public static void teardown() {
        TestKit.shutdownActorSystem(system);
        system = null;
    }

    @Test
    public void testIt() {
        new TestKit(system) {{
            final ActorRef lobbyActor = system.actorOf(LobbyActor.props(),"lobby");
            final String testSessionID = "jaskfjkjaslfalsf";

            // Create TableActor
            for(int i=0;i<10;i++){
                lobbyActor.tell( new TableCreate(i,"table-"+i , TableCreate.Cmd.CREATE),getRef() );
                expectMsg(Duration.ofSeconds(1), "created");
            }

            // Try Connect
            lobbyActor.tell(new ConnectInfo(testSessionID, null,ConnectInfo.Cmd.CONNECT),getRef());
            expectMsg(Duration.ofSeconds(1), "done");

            // Find User
            lobbyActor.tell(new ConnectInfo(testSessionID, null,ConnectInfo.Cmd.FIND),getRef());
            expectMsg(Duration.ofSeconds(1), "User exists");

            // Join Table : Forward Check , lobby->table->game->getRef()
            lobbyActor.tell(new JoinGame(1,"test",testSessionID),getRef() );
            expectMsg(Duration.ofSeconds(1), "joined");

            // Try Disconnect
            lobbyActor.tell(new ConnectInfo(testSessionID, null,ConnectInfo.Cmd.DISCONET),getRef());
            expectMsg(Duration.ofSeconds(3), "done");

            // Find Again
            lobbyActor.tell(new ConnectInfo(testSessionID, null,ConnectInfo.Cmd.FIND),getRef());
            expectMsg(Duration.ofSeconds(1), "User does not exist");
        }};
    }
}
샘플데모

기타 유용한링크
- https://getakka.net/articles/intro/what-are-actors.html
- https://doc.akka.io/docs/akka/2.5/general/addressing.html - Actor Path
- https://www.baeldung.com/akka-with-spring