DataLake의 데이터 구성요소중 Kafka연동 Parquet 다루는부분을 연구중
Kafka에서 출발한 Json이 최종 S3( Paquet 형식)저장되기 까지 Flow를 단일 로컬지점 유닛테스트화 하여 모두작동하는 변종코드를 작성해보았습니다.
MSA 관점에서 생산과 소비의 책임이 다르기 때문에 어플리케이션이 각각 분리 작동되어야하지만 그것이 잘 작동하는지검증하고 다양한 실험을 해보기까지 너무 오랜시간이 걸릴수 있으며~
유닛테스트를 이용해 우리가 사용해야할 실작동 구성요소를 빠르게 검증하는 활동입니다.
Kafka의 수신검증은 물론 S3저장되기까지 과정에서 작동검사를 위해 , 모두 일시중지해서 블락킹검사를 해야하는 전통적 방식이아닌
모든 모듈이 동시적으로 각각 작동을 하면서 비동기 검사를 수행하며 Flow흐름에 따라 동시성처리를 각각 다른방식을 이용하는것이 아닌 Stream을 활용하는 일괄적 구현방식을 채택하였습니다
    /* ProduceAndConsumeToS3AreOK 테스트 시나리오

+--------------+        +--------------+       +--------------+      +--------------+     +--------------+
|              |        |              |       |              |      |              |     |              |
|  Kafka       |        |  Kafka       |       |   Flow       |      | S3 Upload    |     | S3 DownLoad  |
|  (Producer)  |------->|  (Consumer)  |------>|   Convert    |----->|              |---->|              |
|              |        |              |       |   Pqrquet    |      |              |     |              |
|              |        |              |       |              |      |              |     |              |
+--------------+        +--------------+       +--------------+      +--------------+     +--------------+

  JSON 이벤트를 N개 발생  ->    수신검증    ->     N개씩 파일묶음처리   ->    N개파일 업로드검증  ->  N개파일 다운로드검증및 데이터 변환검증

*/ |

AKKA Stream의 코드는 다음과 같은 요소를 이어붙이기 해 복잡한 데이터의 흐름처리를 레고처럼 조립할수 있습니다.
Source<String, NotUsed> sourceJson = Source.range(1, testCount)
        .map(number -> {
                // JSON 형태의 다양한 소스
                S3TestJsonModel s3TestJsonModel = new S3TestJsonModel();
                s3TestJsonModel.count = number;
                String jsonOriginData = mapper.writeValueAsString(s3TestJsonModel);

                // 원본 유지를 위한 정의 모델
                S3TestModel s3TestModel = new S3TestModel();
                s3TestModel.jsonValue = jsonOriginData;
                return mapper.writeValueAsString(s3TestModel);
        });

Flow<String, ProducerRecord<String, String>, NotUsed> flowProducer = Flow.of(String.class)
        .map(value -> new ProducerRecord<>(testTopicName, testKey, value));

Sink<ProducerRecord<String, String>, CompletionStage<Done>> sinkProducer = Producer.plainSink(producerSettings);

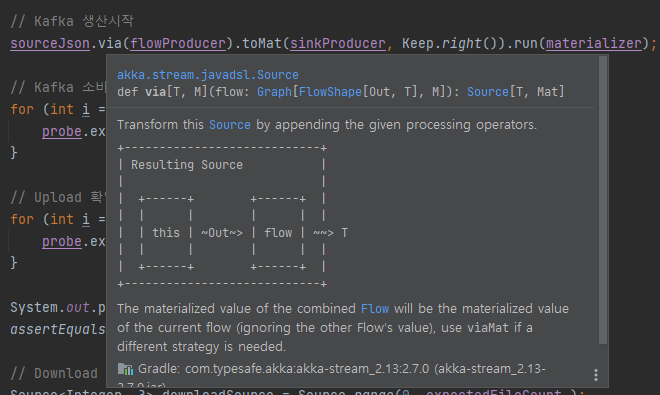
sourceJson.via(flowProducer).toMat(sinkProducer, Keep.right()).run(materializer); |
이 코드는 카프카가 실제작동하며 JSON으로 토픽 생산을하는 완전한 코드입니다.
이 코드내에서 다음을 고민해볼수 있습니다.
public class S3TestModel {

    public String name = "S3TestModel";

    public String version = "0.0.1";

    public String jsonValue;
}

public class S3TestJsonChildModel {

    public String name = "S3TestJsonChildModel";

    public int count = 2;

    public String subData = "SomeData";
} |
Consumer
        .plainSource(
                consumerSettings,
                Subscriptions.topics(testTopicName))
        .grouped(maxEntityPerFile)
        .to(Sink.foreach(group -> {

                S3TestModel model = new S3TestModel();
                model.jsonValue = "example data";

                Schema schema = new Schema.Parser().parse(schemaString);

                // Avro GenericRecord 생성
                GenericRecord record = new GenericData.Record(schema);

                curFileIdx[0]++;

                String dynamicFileKey = fileName + curFileIdx[0];

                group.forEach(msg -> {
                try {
                        // AnyJson을 처리할수 있는~ S3TestModel
                        S3TestModel obj = mapper.readValue(msg.value(), S3TestModel.class);
                        record.put("name", obj.name);
                        record.put("jsonValue", obj.jsonValue);

                } catch (JsonProcessingException e) {
                        throw new RuntimeException(e);
                }
                debugKafkaMsgAndConfirm(msg.key(), msg.value(), confirmActor, testKey, "consumer1");
                });
................. |
Source.single(byteString)
        .runWith(S3.multipartUpload(bucketName, dynamicFileKey)
                .withAttributes(S3Attributes.settings(s3Settings)), materializer)
        .thenAccept(result -> {
                LocalTime now = LocalTime.now();
                DateTimeFormatter formatter = DateTimeFormatter.ofPattern("HH:mm:ss");
                String formatedNow = now.format(formatter);
                System.out.println(formatedNow + " Upload complete: " + result.location());
                confirmActor.tell("s3UploadOK", null);
        })
        .exceptionally(throwable -> {
                System.err.println("Upload failed: " + throwable.getMessage());
                return null;
}); |
downloadSource
        .runForeach(index -> {
        String dynamicFileKey = fileName + (index + 1);

        // S3에서 파일 다운로드
        CompletionStage<Optional<Pair<Source<ByteString, NotUsed>, ObjectMetadata>>> download =
                S3.download(bucketName, dynamicFileKey)
                        .withAttributes(S3Attributes.settings(s3Settings))
                        .runWith(Sink.head(), materializer);

        download.thenAccept(optionalSourcePair -> {
                        optionalSourcePair.ifPresent(sourcePair -> {
                        LocalTime now = LocalTime.now();
                        DateTimeFormatter formatter = DateTimeFormatter.ofPattern("HH:mm:ss");
                        String formatedNow = now.format(formatter);
                        Source<ByteString, ?> downloadbyteSource = sourcePair.first();
                        downloadbyteSource.runWith(Sink.foreach(byteString -> System.out.println(formatedNow + " Downloaded: " + dynamicFileKey)), materializer);
                        confirmActor.tell("s3DownloadOK", null);
                        });
                })
                .exceptionally(throwable -> {
                        System.err.println("Download failed for " + dynamicFileKey + ": " + throwable.getMessage());
                        return null;
                });
}, materializer); |
// KAFKA 1개의 메시지 수신받았다는 이벤트를 관찰자에게 비동기적으로 알려줌~
if (testKey.equals(key)) confirmActor.tell("kafkaOK", null);

================= 분리되어 작동가능한 Context =================

// Kafka 소비 메시지 전체 개수가 맞는지 관찰자를 통해 수신검증 확인 , 여기서 지정된 시간안에 검증확인이 안되면 실패로 간주~
// 검증확인이 빠르게 되면 빠른 검증코드 자동종료로 진행
for (int i = 0; i < testCount; i++) {
 probe.expectMsg(Duration.ofSeconds(5), "kafkaOK");
} |
생산과 소비의 개수를 비동기적으로 할수 있는 간단한 아이디어입니다.
모델검증을 포함할수도 있지만 이것만으로 동시적으로 작동되는 테스트에서 유실없이 모두 처리되었다를 검증할수 있습니다.
유닛테스트 통과만으로 복잡한 Flow가 완료되었나를 검증할수 있지만
일반적인 MockServer(페이크) Test가 아닌 실제 장치를 이용한 테스트로
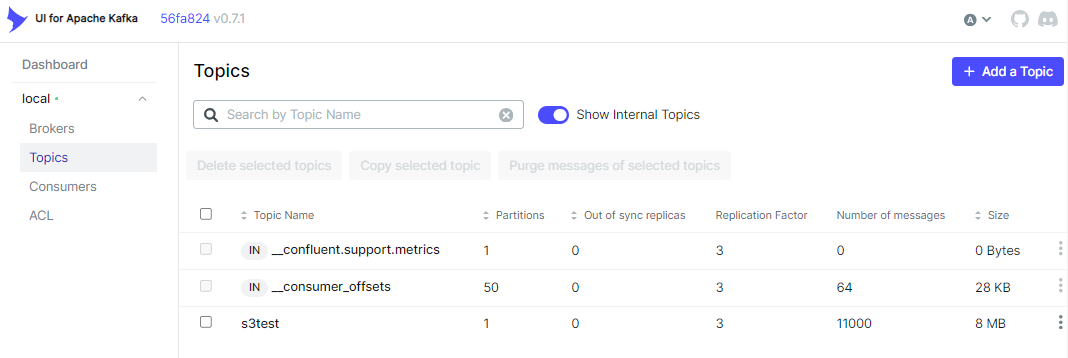
실제 Kafka 장치의 Topic 확인및 개발로그를 확인을 통해 검증및 다양한 추가적인 실험을 한큐에 진행할수 있습니다.
이러한 방법의 도입은 복잡한 Flow처리를 도입해야하기 직전(MSA를 구성하기직전)
복잡한 Flow를 처리할때 연구개발활동을 가속화 할수 있습니다.
코드를 조정하고~ 전체 플로우가 작동되는 반복 테스트는 1분이면 충분합니다.


Kafka를 포함 S3 작동 Flow가 짧고 강력한 이유는~ 인프라 활용 계층의 코드와 도메인 로직과 분리가 되었기 때문입니다.
alphaka는 주변 스택을 잘 이해하고 일괄된 방식으로 인프라 계층의 사용전략을 설정화로 다룹니다.
네트워크를 이용하는 스택에서 네트워크 순단은 발생할수 있기때문에 재시도 정책이 설정으로 분리되어 기능을 제공해줍니다.
   retry-settings {
    max-retries = 3
    min-backoff = 200ms
    max-backoff = 10s
    random-factor = 0.0
} |
만약 위와같이 단절상황에 재시도 하는방법을 코드로 정의 한다고하면
특정 예외 상황을 이해하고 재시도하는 로직을 함께 작성할수 있으며 결과적으로 이러한 코드가 늘어나게되면
도메인 로직이 인프라 예외처리코드에 모두 숨겨져 도메인이 작동하는 방식 자체를 이해하기 어렵게 만들수 있습니다.
이 유닛테스트에 사용된 인프라계층의 설정값
# Properties for akka.kafka.ProducerSettings can be
# defined in this section or a configuration section with
# the same layout.
akka.kafka.producer {
  # Config path of Akka Discovery method
  # "akka.discovery" to use the Akka Discovery method configured for the ActorSystem
  discovery-method = akka.discovery

  # Set a service name for use with Akka Discovery
  # https://doc.akka.io/docs/alpakka-kafka/current/discovery.html
  service-name = ""

  # Timeout for getting a reply from the discovery-method lookup
  resolve-timeout = 3 seconds

  # Tuning parameter of how many sends that can run in parallel.
  # In 2.0.0: changed the default from 100 to 10000
  parallelism = 10000

  # Duration to wait for `KafkaProducer.close` to finish.
  close-timeout = 60s

  # Call `KafkaProducer.close` when the stream is shutdown. This is important to override to false
  # when the producer instance is shared across multiple producer stages.
  close-on-producer-stop = true

  # Fully qualified config path which holds the dispatcher configuration
  # to be used by the producer stages. Some blocking may occur.
  # When this value is empty, the dispatcher configured for the stream
  # will be used.
  use-dispatcher = "akka.kafka.default-dispatcher"

  # The time interval to commit a transaction when using the `Transactional.sink` or `Transactional.flow`
  # for exactly-once-semantics processing.
  eos-commit-interval = 100ms

  # Properties defined by org.apache.kafka.clients.producer.ProducerConfig
  # can be defined in this configuration section.
  kafka-clients {
  }
}

akka.kafka.consumer {

  enable.auto.commit = true

  kafka-clients {
    bootstrap.servers = "localhost:9092"
  }
}

akka.kafka.committer {

  # Maximum number of messages in a single commit batch
  max-batch = 1000

  # Maximum interval between commits
  max-interval = 3s

  # Parallelsim for async committing
  parallelism = 100

  # API may change.
  # Delivery of commits to the internal actor
  # WaitForAck: Expect replies for commits, and backpressure the stream if replies do not arrive.
  # SendAndForget: Send off commits to the internal actor without expecting replies (experimental feature since 1.1)
  delivery = WaitForAck

  # API may change.
  # Controls when a `Committable` message is queued to be committed.
  # OffsetFirstObserved: When the offset of a message has been successfully produced.
  # NextOffsetObserved: When the next offset is observed.
  when = OffsetFirstObserved
}

# 이 설정은 유닛테스트를 위한 LocalStack 호환버전이며, AWS-S3이용시 호환은 아래링크 참고 호환을 시킵니다.
# link : https://github.com/akka/alpakka/blob/main/s3/src/main/resources/reference.conf
alpakka.s3 {
  buffer = "memory"
  disk-buffer-path = ""

  # default values for AWS configuration
  aws {
    credentials {
      provider = static
      access-key-id = "test"
      secret-access-key = "test"
    }

    region {
      provider = static
      default-region = "us-east-1"
    }
  }

  path-style-access = true
  access-style = virtual
  endpoint-url = "http://localhost:4567"
  list-bucket-api-version = 2
  validate-object-key = true

  retry-settings {
    max-retries = 3
    min-backoff = 200ms
    max-backoff = 10s
    random-factor = 0.0
  }

  multipart-upload {
    retry-settings = ${alpakka.s3.retry-settings}
  }

  sign-anonymous-requests = true
} |
AkkaStreamAPI의 함수형접근방식의 개발이 아직은 익숙하지 않은 상태이며 조금더 직관적 방식으로 코드 지속개선중으로
여기서 설명되는 코드는 다음 유닛테스트화되어 전체코드를 살펴볼수 있습니다.
전체코드 :
이 와같은 함수형 Stream방식의 개발방법은 다양한 언어에서도 활용할수 있는 컨셉으로 꼭 AkkaStream이 아니여도 됩니다.
오히려 자신이 가진 기본프레임워크가 강력한 기능을 이미 가지고 있다고 하면 기본 StreamAPI를 이용할것을 권장합니다.

Erik Meijer의 한마디~ "이보게, 브라이언 괴츠, C#,파이선,자바스크립트는 물론 심지어 PHP도 async, await를 지원하고 있다네. 그런 기능이 없는 언어는 자바일뿐이야. 람다를 이용해서 콜백함수를 사용하면 된다고? 천만에 콜백은 최악이야. 도움이 안된다고. 자바 9 버전에 담으려고 하는 걸 다 내려놓고 지금당장 asymc, await부터 넣으라고. 그래야 모두가 행복해질수 있어" |
다양한 함수형 스트림 처리 개발방식 참고링크
기본언어가 채택한 기본기를 먼저 이해한후 우리에게 맞는 방식을 채택하면 되며 AkkaStream일 필요는 없습니다.
요즘 동시성과 병렬성을 함께 다뤄야하는 개발방식이 상호영향을 받아 유사해 보이면서도 차이가 있지만 선택지가 다양해 졌기때문입니다.
우리만의 방법을 채택을 했다면~ 우리가 채택한 개발모델 자체가 유닛테스트 되고 배포없이 로직 개선시도를 해볼수 있는가?는 고민해볼필요가 있습니다.
카프카와 같은 큐시스템을 적극적으로 채택했다고하면 여기서 소개한 이벤트 수신검증 유닛테스트를 각자의 언어에서 동일한 컨셉으로 작동 시도해보는것은 좋은 연습 과제일수 있습니다.
연관 컨텐츠:
상위 페이지 : alpakka